
There’s a GORGEOUS all-inclusive kit in the 2018 Occasions called “Lots of Happy Card Kit” that contains everything you need to create 20 cards. The stamp set that is included in this kit is terrific and it’s what I used on my card. There are four new Watercolour Pencils in the kit too: Lemon Lime Twist, Rich Razzleberry, Old Olive and Flirty Flamingo. I used these (along with Bermuda Bay) to colour in the flowers and leaves.

I also used the fabulous “Celebrate You” thinlits dies that you can get
for FREE with a $60 order during Sale-a-bration! And did you notice that
stunning glimmer paper behind the cut words? It’s also new and part of
the “Myth & Magic” glimmer paper assortment in the 2018 Occasions
catalogue. See that beautiful shimmery ribbon? It’s part of three roll ribbon pack that you can get for FREE during Sale-a-bration too!!! Are you getting excited yet? You’re truly going to fall in love with all the new products – Stampin’ Up! has hit out of the ball park yet again!
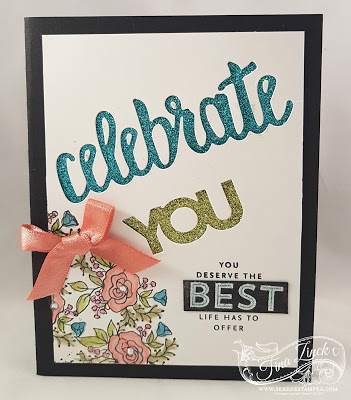
- Stamp Sets – Lots of Happy Card Kit (Occasion 146388)
- Card Stock – Whisper White (100730); Basic Black (121045)
- Stamp Pads – Black Memento (132708); Versa Mark (102283)
- Misc.- Big Shot (143263); Magnetic Platform (130658); Celebrate You Thinlits Dies (SAB 146840); Shimmer Ribbon Pack (SAB 147243); Mini Glue Dots (103683); Clear Block C (118486); Blender Pen (102845); Watercolor Pencils (141709); Myths & Magic 6” x 6” Glimmer Paper (Occasions 145601); White Stampin’ Emboss Powder (109132); Heat Tool (129053); Embossing Buddy (103083); Multipurpose Liquid Glue (110755); Rhinestone Basic Jewels (144220); Scotch tape; Clear Wink of Stella (141897)
Measurements:
- Basic Black: 8 1/2” x 5 1/2” scored at 4 1/4” plus scrap piece
- Whisper White: 5” x 3 3/4”
- Myths & Magic Blue Glimmer Paper: 2” x 3 3/4”
- Myths & Magic Green Glimmer Paper: 1” x 3 3/4”
Instructions:
1. Fold Basic Black card stock in half to create card base and set aside.
2. Place dies from “Celebrate You” thinlits on Whisper White card stock (on diagonal) and run through the Big Shot using the Magnetic Platform. When removing the cut pieces be careful to keep the little bits that go inside the letters, as they will be glued on later.
3. Place the blue glimmer paper behind the “Celebrate” and tape in place. Repeat with the green glimmer paper behind the “You” and tape in place. Trim any excess off the edge of the Whisper White layer. Use Multipurpose Liquid Glue to adhere the little bits that go inside the cut letters (as shown on sample).
4. Use Black Memento ink to stamp flowers and sentiment on front of Whisper White layer using the stamps from “Lots of Happy Card Kit”. Colour with the Watercolour Pencils that came with the kit, as well as the Bermuda Bay pencil from the Watercolour Pencils set (annual catalogue). Use blender pen over the coloured images then add some Clear Wink of Stella. Use Multipurpose Liquid Glue to adhere to card base.
5. Rub embossing buddy over a scrap piece of Basic Black card stock. Ink sentiment from “Lots of Happy Card Kit” with Veramark and stamp onto black card stock. Sprinkle White Stampin’ Emboss Powder over, shaking off excess, and set with heat tool. Use Bermuda Bay Watercolour Pencil on inside of “Best”. Trim piece and adhere to card, over the original stamped image.
6. Add Basic Rhinestones to flowers on the card.
7. Make a bow with the Shimmery Ribbon and use Mini Glue Dots to adhere to card.
8. For inside of card: cut Whisper White paper 5 1/4” x 4” and glue inside. Stamp sentiment and flowers from “Lots of Happy Card Kit”. Optional: cut second flower image on scrap paper to use as a mask. Use the Watercolour Pencils from the “Lots of Happy Card Kit” to colour the flowers and leaves. Add a touch of Clear Wink of Stella.
 |
| Inside of card. |

Every customer who places orders through my online store will receive a PDF tutorial, featuring 12 beautiful card
projects. Every project sheet includes along with measurements, step-by-step instructions and supplies
list.
Simply enter this month’s special host code (shown on the red banner, above) prior to submitting
your order through my website. If your order is $200 or more DO NOT enter the
host code so that you will also receive your stamping rewards and I will then
send you the PDF tutorial. All qualified orders will receive the download
by e-mail.


Leave a Reply